How to Use a Plaster Saw Effectively for Your DIY Projects?
In the world of DIY projects, mastering tools can make all the difference. One such tool is the Plaster Saw, an essential instrument for cutting and shaping plaster with precision. Industry expert John Smith once said, “A well-used Plaster Saw is like a painter’s brush; it defines the final masterpiece.” His insight sheds light on the importance of using this tool effectively.
Using a Plaster Saw requires skill and practice. It's not just about cutting; it’s about achieving clean edges and accurate shapes. When beginners rush into their projects, they often overlook the intricacies of the cut. This can lead to unsatisfactory results. Each slice matters, and technique is key. For instance, positioning your hands correctly can drastically affect the outcome.
Moreover, it’s common for DIY enthusiasts to face challenges. Perhaps the Plaster Saw feels awkward at first. The grip might be uncomfortable, or the blade appears intimidating. Reflecting on those moments can help improve technique. Each mistake offers a lesson, paving the way for mastery. Ultimately, using a Plaster Saw is an art form, and every artist has room to grow.
Understanding the Basics of a Plaster Saw and Its Uses
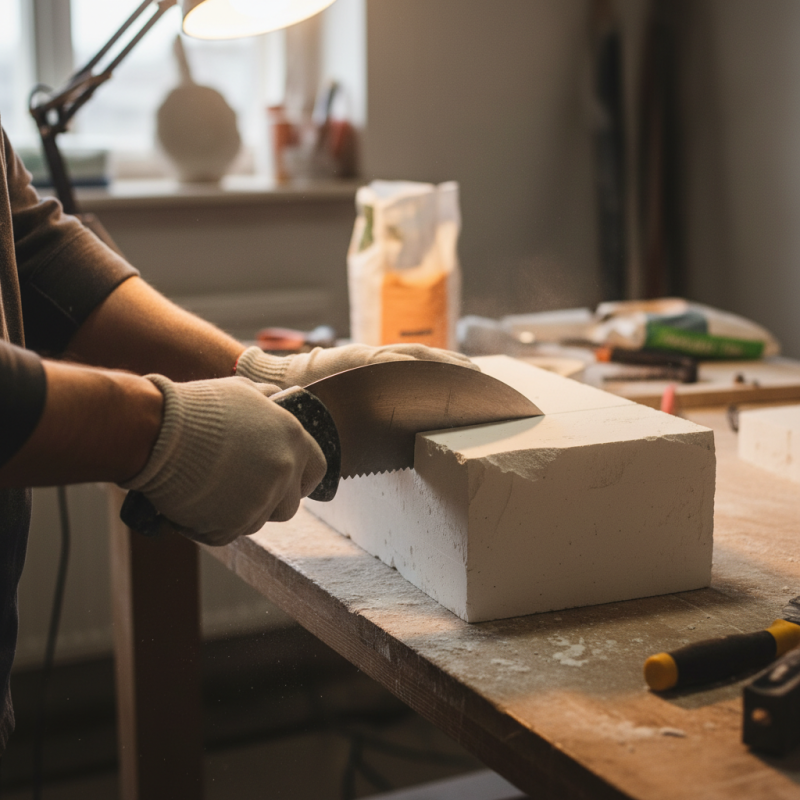
A plaster saw is a unique tool designed for cutting plasterboard or drywall. Its blade features fine teeth, making it ideal for smooth curves and straight lines. Understanding the basics helps ensure effective use for your DIY projects. Whether you're creating a new wall or fitting around electrical outlets, this tool can simplify the process.
When using a plaster saw, grip it firmly for better control. Avoid applying too much pressure; let the saw do the work. If you find the cut uneven, adjust your technique. It’s also wise to practice on scrap pieces before tackling your main project. This way, you can build confidence and refine your skills.
Tips to remember: Always wear safety gear to protect your eyes and lungs. Dust can create a mess and be irritating. Take breaks if you feel fatigued; improper cuts are more likely when tired. Don’t rush through your project. Sometimes, slowing down leads to better outcomes.
How to Use a Plaster Saw Effectively for Your DIY Projects
| Feature | Description |
| Blade Type | Typically consists of small teeth designed to cut through plaster. |
| Ideal Materials | Best used on plaster walls, ceilings, and other plaster-based materials. |
| Cutting Techniques | Use a steady hand and gentle pressure to create smooth cuts. |
| Safety Tips | Always wear safety goggles and a mask to protect from dust. |
| Maintenance | Regularly clean the blade to prevent material build-up and ensure longevity. |
| Common Uses | Ideal for making precise cuts in plaster boards for installation and repairs. |
Selecting the Right Plaster Saw for Your DIY Project
When selecting the right plaster saw for your DIY project, consider the type of cuts you need to make. A plaster saw with sharp, serrated edges is ideal for quick, rough cuts. This tool handles materials like drywall and plasterboard easily. Choose one that feels comfortable in your hand. A good grip is essential for control.
Think about the size of the plaster saw. A smaller, compact saw may be better for tight spaces. Larger saws can handle bigger sections of material. However, they can be cumbersome. Remember that weight matters, too. A heavy plaster saw can lead to fatigue during longer tasks.
Reflect on your past DIY experiences. Have you struggled with the right tool? If so, it may be time to invest in a better option. A plaster saw should enhance your workflow. Take your time in making a decision. Don't rush into buying the first one you see. Sometimes, the right choice can make or break your project.
Step-by-Step Guide to Preparing for Plaster Saw Usage
Preparing for plaster saw usage requires attention to detail. Before you start your project, ensure your workspace is organized. A clean area minimizes accidents. According to the Home Improvement Research Institute, 23% of DIY injuries result from poor preparation. Gather all tools needed: dust masks, goggles, and gloves. Safety is paramount, especially with a tool known for its precision cuts.
Next, practice cutting on scrap materials. This builds confidence and skill. A study by the National Safety Council shows that familiarizing yourself with tools can reduce mistakes by over 30%. If you encounter difficulties, adjust your grip or change your angle. Not all cuts will be perfect initially. Reflect on your technique after each practice session. Each mistake leads to improvements and better results.
Lastly, always check your saw's blade. A dull blade can cause frustration and uneven cuts. Inspect it for wear and tear before starting. Regular maintenance can extend the tool's life. According to the American Tool Association, proper maintenance can increase efficiency by up to 50%. Embrace the learning curve. Every project is a chance for growth.
Techniques for Safely Operating a Plaster Saw
Using a plaster saw requires careful attention and safety measures. Always wear protective eyewear to shield against flying debris. Vacuum the area to reduce dust. Dust masks can help you breathe easier during the project. It's important to have a sturdy work surface. A stable platform prevents slips and mistakes.
Grip the plaster saw firmly but avoid exerting too much pressure. Too much force can lead to mistakes. Let the tool do the work. Start with gentle strokes and increase speed gradually. Pay attention to the angle of the blade. A poor angle makes cutting more difficult and can be dangerous.
Practice on scrap pieces before working on your main project. This will build confidence and help you identify any potential issues. Mistakes will happen. Reflect on them and adjust your technique accordingly. Slow down when you feel uncertain. Precision will improve with patience and practice.
Maintenance Tips to Ensure Longevity of Your Plaster Saw
Maintaining a plaster saw is crucial for its efficiency and longevity. Regular cleaning after each use is essential. Dust and debris can build up and hinder performance. A simple brush can help remove particles from the blade. Occasionally, wipe the blade down with a damp cloth. This prevents rust and keeps it sharp.
Inspecting the saw regularly is another key maintenance tip. Check the blade for any damages or dullness. If it feels less effective, consider sharpening or replacing the blade. This can significantly improve cutting accuracy. A worn-out blade makes every cut feel like a struggle and can lead to mistakes.
Proper storage is often overlooked. Keeping the plaster saw in a dry, safe place prevents unnecessary wear. A protective case can shield it from dust and moisture. Sometimes, we leave tools lying around, and neglect can lead to damage. Reflect on your storage habits; good practices can extend the tool’s lifespan.